Succulent Love

The new house (which i will blog about soon), has a huge balcony that is perfect for a sort of indoor/outdoor garden. It doesn't have soil where in I can just stick plants and they'll grow, so I needed plants in pots. Growing plants in pots is a bit scary as they need to be cared for carefully compared to plants that just randomly grow on actual soil - or so I thought.

Good thing we, Daene and I went to the succulent workshop organized by Femi! I've always wanted to have plants around the house but wasn't really sure what kind of plants and how to take care of them. We were taught that succulents are very low maintenance indoor plants. They can thrive on their own and needs minimal to 0 care. Some actually prefers to be ignored! My kind of plants! It was very informative and we got to take home our own gardening tools. Here are some snapshots from the workshop:


How cute is this succulent buffet

I went home with my succulent dish and started not taking care of it. As discussed in the workshop, it only needs to be watered once a week, so that's what I did.

After a few weeks I noticed new sprouts in my succulents and decided, "Hey, I can actually grow plants"! So I went plant shopping and I may be growing a succulent forest already! Here are my babies so far:

Those are actually shoe racks that I turned into pot holders 


My dish was starting to get a bit crowded so I went ahead and started propagation using leaf and stem cutting methods, which we also learned from the workshop:


My leaf cuttings are already growing roots! I can't wait for the new leaves to grow so that I can place them in cute pots


Since my garden is growing, I decided to do some DIY planters to accomodate the baby plants and beautify our outdoor space some more.

I had this teapot lying around the house, so I figured I'll just put a plant on it. It looks super cute with it's zebra cactus hair style, puffy cheeks and gold ribbon!


 Also, just recently, we watched Guardians of the Galaxy and I really love love that movie! So, I created a GOTG themed succulent set with my two favorite guardians Groot and Rocket (that box thing is supposed to be a jukebox and it somehow looks like a pig lol!)


That's all for now and hope you enjoyed this post! '',

Read more...

Kislap Traveller's Notebook

It has been a while since my last post.I've been really busy with moving out of the rented condominium unit to moving in to our owned condominium unit. Yes! we finally decided to buy our own home and moving in was a lot of work. It was all worth it though as the home is now starting to really feel like ours.  I will do a home tour once everything is in place. So excited!

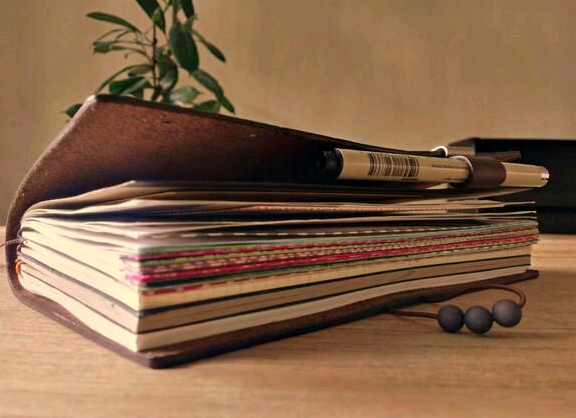
Speaking of moving in, I also moved in to my new notebook. I've been using a small notebook with vintage floral print for 2 years now, for random notes and doodles. I was running out of pages so I had to look for a new notebook. I had several, but none of them felt right. I even tried on using a planner which I wrote about here. It  was fun at first and was able to do a lot with it. Eventually though, I realized that it was too bulky for me. I also tried creating my own fauxdori. I loved it. But again, too big for small bags that I like to carry around. If I need to bring it, I will need to carry it in a big bag. That has been my main dilemma. So I looked for other smaller notebooks. I found a lot of cute ones but I thought a refillable one is more practical. Then Alunsina Handbound books came up with their Kislap series and it was perfect. Alunsina is a local craft store specializing in leather bound journals and planners. You can check some of their products here.

Say hi to my Kislap notebook! Which I still need to name.


I chose the brown distressed variety because of it's vintage look. The leather is soft and smells sooooo good. I like smelling it. 

I had my initial, well part of, imprinted on the cover leather and my full first name at the bottom. I also chose the plane charm because I like to travel but am scared of flying - so maybe a plane charm will help me manage my fear of flying - fingers crossed.

I have a thing for pouches. Almost all of the things that I own have their own pouch or container. I just like it organized. 


I have overused this fabric and the last piece is just enough for my Kislap pouch. I also sewn in a small pocket to house some pens and used little charms for the draw strings. Ofcourse I had a put a crown on it too. It will be easier to carry my notebook and all the paraphernalia that I need in planning because of the pouch.


The notebook fits perfectly in the pouch. I left a 2 inch allowance at the top so that the bookmarks won't get crumpled when you close it.


Now let's get inside the notebook


It's pretty stuffed, which I like.

First up is the mini kraft folder that I made to hold small paper stuff. There are times when you need just a small piece and it's a waste to tear off from the notebook. 


The first notebook is for random notes or details that I need to write down immediately.  I used the other side as a dashboard for stickons, I also use a magnetic paper marker to group together used pages so that when I need to write down something, it will immediately bring me to the next available page.
 

There are also page markers to mark the notes that I need to get back to later. 


After the first notebook is the other half kraft of the folder. 


The next notebook, the lined one is for all the important personal details that I usually forget. I didn't take a picture because, these are a bit confidential.

The next notebook is the grid one which I basically use as a planner. I stamped dates on it 


I also cut out the monthly view from my Lilly Pulitzer planner and transferred it to a blank page. I used paper tape to stick it so that come the next month, I can use the same page and the tape won't damage the paper. 


I also keep a bulldog clip to group together pages that the paper clip can no longer hold - for easy writing.

 The notebook set comes with felt card pockets. I use it for coffeeshop loyalty cards, stickers, post its and washi dashboard. 


I also created a "Today" marker. I reused the laminated paper from my old planner.  


The marker also serves as a dashboard for more stickons. 


I love carrying my notebook around. It's small enough to fit even in my smallest purse but has enough space to get creative.

So, YEY! 


Read more...

Coffee Sleeves: 30 minute DIY project

I've been meaning to make coffee sleeves for the longest time!I had a few trials before I was able to figure out how to really do it.

Materials:
Fabric
Colored buttons
Elastics

Cut your fabric in rectangular shapes: 10.5 inches long and around 4 inches wide


Using a taylor's chalk, trace the pattern to mark where you will need to sew, Make sure that one side of the fabric is facing up and the other is facing down


Sew the fabric following the pattern you just created in step 2


Cut 2 inches of elastic, create a loop and sew it on one side between the 2 fabrics. Make sure that the loop is on the inside up to this point. Leave at least 1.5 inches open so that you can insert fiber later on to make the sleeve thicker. Cut the excess fabric but retain at least half an inch 


Reverse the fabric so that it will look like this


Sew a button on the other end


I used different prints on this one for a 2 in 1 effect (you need to put a button on each side too)


A sleeve took me around 30 minutes to complete! Fast, easy and cheap! Now you know what you're getting for Christmas ^^,


Read more...

Midori Inspired Traveler's Notebook: DIY

Midori Traveler's notebook is popular among planner and leather craft addicts (pictures are from Pinterest). Some people don't just use it for it's primary purpose which is to document one's travel experience, they use it as a planner too!


Aside from the simplicity of the notebook itself, the Midori system is also very useful, basic but useful - very Japanese. You can check the site on how the system works.

Upon buying, you'll get the leather cover, 3 notebooks and 2 elastics. This retails for around 1700php. For a leather product, this is already ok. However, I just can't spend on another notebook. I have several unused notebooks at home. So, I figured I just need to create one for myself. Just to beat the bug and not be forced to buy one.

Below is how I made my own Midori inspired traveler's notebook a.k.a as Fauxdori:

Materials:
Leather
colored paper
printed craft paper
elastics

First off, cut your leather


Add holes on the side for the main elastic


Now make your own notebook inserts using colored papers as the main pad and printed craft paper as notebook cover


Cut the elastics (got these from National bookstore)


Compile the notebooks in the leather cover following the midori system or you can design your own system! 


Usually people who own this notebook, put a notebook charm just to personalize it more - so I did too 


There you go, my very own fauxdori! Can't wait to use this for my future travels!


Read more...

About This Blog

  © Blogger template Shush by Ourblogtemplates.com 2009

Back to TOP